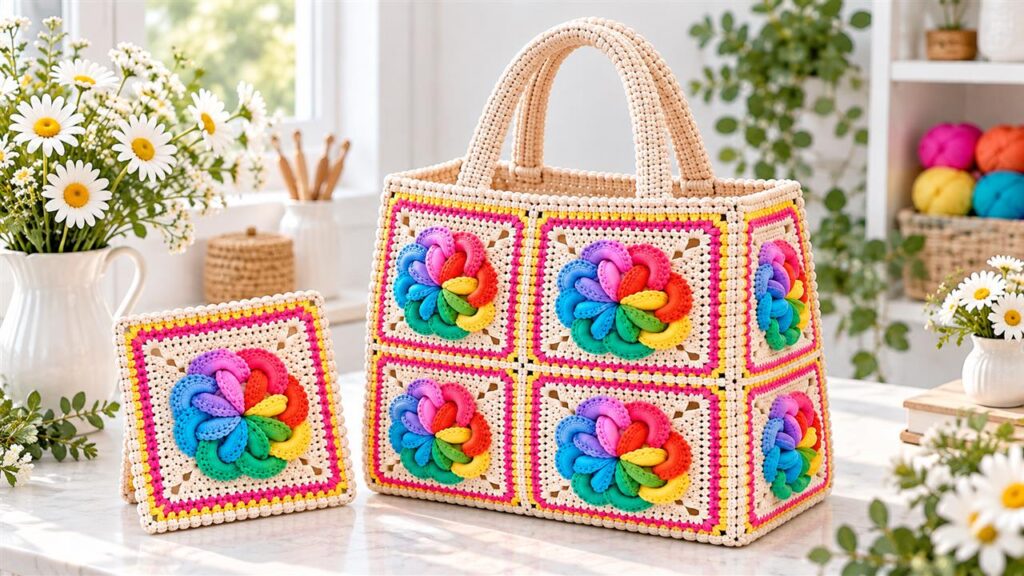
This colorful radial granny square tote transforms bright ribbed wedges into a playful geometric crochet bag. Each square begins with a small cream center, expands into a rainbow wheel, and finishes with an airy cream border that creates clear corners. Joined on the diagonal, the motifs give the tote a lively patchwork surface while the neutral handles keep the design cohesive.
This English guide accompanies the embedded video tutorial. It explains the construction concept, color planning, shaping, blocking, joining, handle reinforcement, and finishing. Follow the video for the designer’s exact yarn, hook size, stitch counts, wedge sequence, and assembly method.
Colorful Radial Granny Square Tote Video Tutorial
Why This Rainbow Crochet Bag Is Special
The radial motif looks like a color wheel made from raised crochet wedges. Fuchsia, coral, yellow, turquoise, blue, violet, green, and red create strong movement around the cream center. The outer lace turns the circle into a square without hiding the textured spokes.
Because the bag is motif based, you can crochet one square at a time and carry the project easily. The pattern is also excellent for using coordinated yarn leftovers, practicing clean color changes, and learning how circular elements are squared for assembly.
Suggested Materials
- Cream yarn for centers, lace borders, joining, and handles
- Several bright colors for the radial wedges
- A crochet hook suited to the selected yarn
- Scissors, yarn needle, and stitch markers
- Blocking mats and rust-resistant pins
- Optional fabric lining, magnetic snap, and base insert
Use yarns with similar thickness, fiber content, and care requirements. Cotton or cotton-blend yarn gives the tote useful structure and crisp stitch definition. Smooth acrylic may be lighter and easier to wash. Make a test square before purchasing or cutting all colors.
Understanding the Radial Granny Square
The central ring anchors the motif. Ribbed wedges are built outward in a planned sequence so they form a complete wheel. The final cream rounds add chain spaces, corner groups, and decorative arches that create a square frame around the circle.
Mark the beginning and ending point of each wedge. Maintain the same tension and stitch height throughout the color wheel. If one section is tighter, the motif may cup or twist. Compare each wedge with the previous one before changing yarn.
Step-by-Step Project Overview
- Plan the palette. Arrange the colors in a fixed order and photograph the sequence.
- Crochet the center. Follow the video for the starting ring and first cream stitches.
- Build the radial wedges. Change colors neatly and keep each ribbed section consistent.
- Close the wheel. Join the final wedge without twisting or crowding the center.
- Square the motif. Add the cream lace rounds and mark all four corners.
- Repeat the squares. Use the first finished motif as a measurement reference.
- Weave in ends. Secure every color tail through dense stitches on the back.
- Block the motifs. Pin all squares to equal dimensions and allow them to dry.
- Join the bag body. Arrange the squares diagonally and seam them in order.
- Add the top and handles. Stabilize the opening and reinforce handle attachments.
Planning a Balanced Color Sequence
Lay small yarn lengths in a circle before beginning. Alternate warm and cool colors to keep similar shades from merging visually. If you prefer a calmer bag, repeat four colors twice rather than using eight separate shades.
Keep the cream center and border consistent across every square. That neutral frame unifies the different colors and makes the joined motifs easier to read. Label yarn balls or write the sequence down to avoid accidental changes.
Clean Color Changes
Complete the final pull-through of the previous stitch with the new color. Leave a tail long enough to weave in securely, and avoid tight knots near the center. Organize small yarn balls in a basket so they do not tangle as the motif rotates.
When the wheel is complete, inspect the joins from the front and back. Tails should not show through the open lace border. Weave each one in more than one direction and trim only after the motif has been gently stretched.
Keeping the Motifs Flat and Square
Cupping usually indicates tight tension, missing increases, or a hook that is too small. Rippling may indicate extra stitches or overly loose chains. Count every repeat and lay the motif flat after each major section.
During the cream border, identify the four corners early. Each side should contain the same number of stitches and spaces. Blocking can refine small differences, but it cannot correct a seriously uneven stitch count.
Joining the Bag Panels
Arrange all blocked squares in the exact layout before seaming and photograph the result. The diagonal orientation creates the tote’s distinctive shape. Stack or label the motifs in order so none are rotated during joining.
Use cream yarn for cohesive seams. A slip-stitch join adds definition, single crochet creates a raised ridge, and an invisible seam gives a flatter result. Follow the tutorial’s method for the closest appearance. Keep joins secure but flexible so the bag can expand naturally.
Making Strong Crochet Handles
Handles receive constant stress. Use firm, even stitches and consider working over an inner cord if compatible with the design. Measure and mark both attachment positions before sewing. Count the stitches between them so the handles remain symmetrical.
Reinforce the inside of the bag where each handle begins. A lining can distribute weight, protect the motif seams, and prevent small objects from slipping through the open border spaces.
Optional Lining and Closure
Measure the assembled bag after blocking, add a seam allowance, and sew a simple fabric lining. Attach it just below the upper crochet edge without pulling the stitches. Add pockets before placing the lining inside.
A magnetic snap, zipper, button loop, or drawstring can make the tote more secure. Choose lightweight hardware and reinforce its attachment area with fabric so it does not distort the crochet.
Color Variations and Project Ideas
Create a pastel version with blush, lavender, mint, butter yellow, and sky blue. For an autumn tote, use rust, mustard, olive, burgundy, and brown. A monochromatic design can move from pale to dark shades around each wheel.
The motif also works for cushions, market bags, table runners, blankets, wall hangings, and laptop sleeves. One square can become a decorative pocket or small pouch panel.
Frequently Asked Questions
Is this tote suitable for beginners?
It is best for a confident beginner or intermediate crocheter who understands basic stitches, color changes, working in rounds, corners, and joining. The video helps explain the unusual ribbed wedges.
How can I make the bag larger?
Use additional motifs or adjust their size, then recalculate the layout, lining, top opening, and handles. Make a paper layout before joining.
Why is my wheel not lying flat?
Check wedge stitch counts, increases, yarn thickness, and tension. Correct the shaping before adding the square border.
Can I use leftover yarn?
Yes, provided the yarns have compatible thickness and care instructions. Weigh one completed wedge or square to estimate how much of each color is required.
Save This Colorful Crochet Tote
Save the vertical tutorial image to Pinterest so you can return to the project later. This rainbow radial granny-square bag is a joyful way to practice color work while creating a useful handmade accessory.